AIfES 2  2.0.0
Tutorial inference F32

This tutorial should explain how the different components of AIfES 2 work together to perform an inference (/ prediction / forward pass) on a simple Feed-Forward Neural Network (FNN) or Multi Layer Perceptron (MLP). It is assumed, that the trained weights are already available or will be calculated with external tools on a PC. If you want to train the neural network with AIfES, switch to the training tutorial.

Example

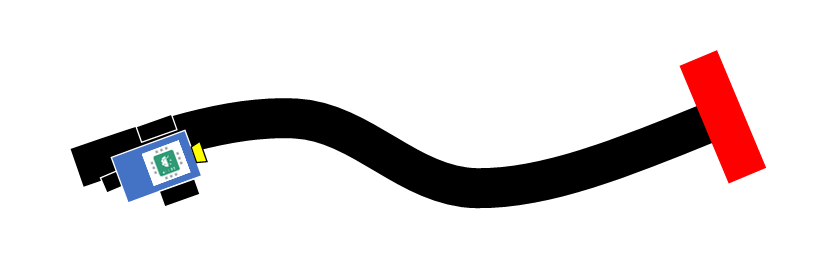
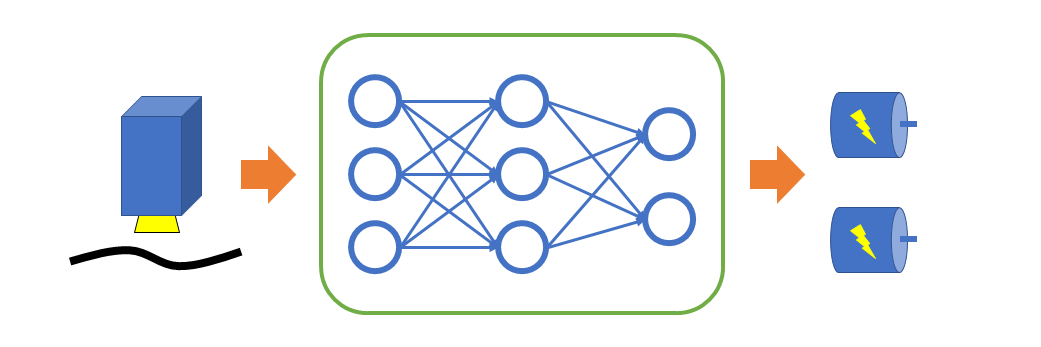
As an example, we take a robot with two powered wheels and a RGB color sensor that should follow a black line on a white paper. To fulfill the task, we map the color sensor values with an FNN directly to the control commands for the two wheel-motors of the robot. The inputs for the FNN are the RGB color values scaled to the interval [0, 1] and the outputs are either "on" (1) or "off" (0) to control the motors.

The following cases should be considered:

  1. The sensor points to a black area (RGB = [0, 0, 0]): The robot is too far on the left and should turn on the left wheel-motor while removing power from the right motor.
  2. The sensor points to a white area (RGB = [1, 1, 1]): The robot is too far on the right and should turn on the right wheel-motor while removing power from the left motor.
  3. The sensor points to a red area (RGB = [1, 0, 0]): The robot reached the stop mark and should switch off both motors.

The resulting input data of the FNN is then

R G B
0 0 0
1 1 1
1 0 0

and the output should be

left motor right motor
1 0
0 1
0 0

Design the neural network

To set up the FNN in AIfES 2, we need to design the structure of the neural network. It needs three inputs for the RGB color values and two outputs for the two motors. Because the task is rather easy, we use just one hidden layer with three neurons.

To create the network in AIfES, it must be divided into logical layers like the fully-connected (dense) layer and the activation functions. We choose a Leaky ReLU activation for the hidden layer and a Sigmoid activation for the output layer.

Get the pre-trained weights and biases

To perform an inference you need the trained weights and biases of the model. For example you can train your model with Keras or PyTorch, extract the weights and biases and copy them to your AIfES model.
For a dense layer, AIfES expects the weights as a matrix of shape [Inputs x Outputs] and the bias as a matrix of shape [1 x Outputs].

Example model in Keras:

model = Sequential()
model.add(Input(shape=(3,)))
model.add(Dense(3))
model.add(LeakyReLU(alpha=0.01))
model.add(Dense(2))
model.add(Activation('sigmoid'))

Example model in PyTorch:

class Net(nn.Module):
def __init__(self):
super(Net, self).__init__()
self.dense_layer_1 = nn.Linear(3, 3)
self.leaky_relu_layer = nn.LeakyReLU(0.01)
self.dense_layer_2 = nn.Linear(3, 2)
self.sigmoid_layer = nn.Sigmoid()
def forward(self, x):
x = self.dense_layer_1(x)
x = self.leaky_relu_layer(x)
x = self.dense_layer_2(x)
x = self.sigmoid_layer(x)
return x

Our example weights and biases for the two dense layers after training are:

\[ w_1 = \left( \begin{array}{c} 3.64540 & -3.60981 & 1.57631 \\ -2.98952 & -1.91465 & 3.06150 \\ -2.76578 & -1.24335 & 0.71257 \end{array}\right) \]

\[ b_1 = \left( \begin{array}{c} 0.72655 & 2.67281 & -0.21291 \end{array}\right) \]

\[ w_2 = \left( \begin{array}{c} -1.09249 & -2.44526 \\ 3.23528 & -2.88023 \\ -2.51201 & 2.52683 \end{array}\right) \]

\[ b_2 = \left( \begin{array}{c} 0.14391 & -1.34459 \end{array}\right) \]

Create the neural network in AIfES

AIfES provides implementations of the layers for different data types that can be optimized for several hardware platforms. An overview of the layers that are available for inference can be seen in the overview section of the main page. In the overview table you can click on the layer in the first column for a description on how the layer works. To see how to create the layer in code, choose one of the implementations for your used data type and click on the link.
In this tutorial we work with the float 32 data type (F32 ) and use the default implementations (without any hardware specific optimizations) of the layers.

Used layer types:

Used implementations:

Declaration and configuration of the layers

For every layer we need to create a variable of the specific layer type and configure it for our needs. See the documentation of the data type and hardware specific implementations (for example ailayer_dense_f32_default()) for code examples on how to configure the layers.

Our designed network can be declared with the following code.

// The main model structure that holds the whole neural network
aimodel_t model;
// The layer structures for F32 data type and their configurations
uint16_t input_layer_shape[] = {1, 3};
ailayer_input_f32_t input_layer = AILAYER_INPUT_F32(2, input_layer_shape);
const float dense_layer_1_weights[3*3] = { 3.64540f, -3.60981f, 1.57631f,
-2.98952f, -1.91465f, 3.06150f,
-2.76578f, -1.24335f, 0.71257f};
const float dense_layer_1_bias[1*3] = {0.72655f, 2.67281f, -0.21291f};
ailayer_dense_f32_t dense_layer_1 = AILAYER_DENSE_F32_M(3, dense_layer_1_weights, dense_layer_1_bias);
ailayer_leaky_relu_f32_t leaky_relu_layer = AILAYER_LEAKY_RELU_F32_M(0.01f);
const float dense_layer_2_weights[3*2] = {-1.09249f, -2.44526f,
3.23528f, -2.88023f,
-2.51201f, 2.52683f};
const float dense_layer_2_bias[1*2] = {0.14391f, -1.34459f};
ailayer_dense_f32_t dense_layer_2 = AILAYER_DENSE_F32_M(2, dense_layer_2_weights, dense_layer_2_bias);
ailayer_sigmoid_f32_t sigmoid_layer = AILAYER_SIGMOID_F32_M();
General Dense layer structure.
Definition: ailayer_dense.h:71
General Input layer structure.
Definition: ailayer_input.h:39
Data-type specific Leaky ReLU layer struct for F32 .
Definition: ailayer_leaky_relu_default.h:51
General Sigmoid layer struct.
Definition: ailayer_sigmoid.h:47
AIfES artificial neural network model.
Definition: aifes_core.h:181

We use the initializer macros with the "_M" at the end, because we need to set our parameters (like the weights) to the layers.

Connection and initialization of the layers

Afterwards the layers are connected and initialized with the data type and hardware specific implementations

// Layer pointer to perform the connection
model.input_layer = ailayer_input_f32_default(&input_layer);
x = ailayer_dense_f32_default(&dense_layer_1, model.input_layer);
x = ailayer_leaky_relu_f32_default(&leaky_relu_layer, x);
x = ailayer_dense_f32_default(&dense_layer_2, x);
x = ailayer_sigmoid_f32_default(&sigmoid_layer, x);
model.output_layer = x;
// Finish the model creation by checking the connections and setting some parameters for further processing
uint8_t aialgo_compile_model(aimodel_t *model)
Initialize the model structure.
ailayer_t * ailayer_dense_f32_default(ailayer_dense_f32_t *layer, ailayer_t *input_layer)
Initializes and connect a Dense layer with the F32 default implementation.
ailayer_t * ailayer_input_f32_default(ailayer_input_f32_t *layer)
Initializes and connect an Input layer with the F32 default implementation.
ailayer_t * ailayer_leaky_relu_f32_default(ailayer_leaky_relu_f32_t *layer, ailayer_t *input_layer)
Initializes and connect a Leaky ReLU layer with the F32 default implementation.
ailayer_t * ailayer_sigmoid_f32_default(ailayer_sigmoid_f32_t *layer, ailayer_t *input_layer)
Initializes and connect a Sigmoid layer with the F32 default implementation.
AIfES layer interface.
Definition: aifes_core.h:252
ailayer_t * input_layer
Input layer of the model that gets the input data.
Definition: aifes_core.h:182
ailayer_t * output_layer
Output layer of the model.
Definition: aifes_core.h:183

Print the layer structure to the console

To see the structure of your created model, you can print a model summary to the console

aiprintf("\n-------------- Model structure ---------------\n");
aiprintf("----------------------------------------------\n\n");
void aialgo_print_model_structure(aimodel_t *model)
Print the layer structure of the model with the configured parameters.

Perform the inference

Allocate and initialize the working memory

Because AIfES doesn't allocate any memory on its own, you have to set the memory buffers for the inference manually. This memory is required for example for the intermediate results of the layers. Therefore you can choose fully flexible, where the buffer should be located in memory. To calculate the required amount of memory for the inference, the aialgo_sizeof_inference_memory() function can be used.
With aialgo_schedule_inference_memory() a memory block of the required size can be distributed and scheduled (memory regions might be shared over time) to the model.

A dynamic allocation of the memory using malloc could look like the following:

uint32_t inference_memory_size = aialgo_sizeof_inference_memory(&model);
void *inference_memory = malloc(inference_memory_size);
// Schedule the memory to the model
aialgo_schedule_inference_memory(&model, inference_memory, inference_memory_size);
uint8_t aialgo_schedule_inference_memory(aimodel_t *model, void *memory_ptr, uint32_t memory_size)
Assign the memory for intermediate results of an inference to the model.
uint32_t aialgo_sizeof_inference_memory(aimodel_t *model)
Calculate the memory requirements for intermediate results of an inference.

You could also pre-define a memory buffer if you know the size in advance, for example

const uint32_t inference_memory_size = 24;
char inference_memory[inference_memory_size];
...
// Schedule the memory to the model
aialgo_schedule_inference_memory(&model, inference_memory, inference_memory_size);

Run the inference

To perform the inference, the input data must be packed in a tensor to be processed by AIfES. A tensor in AIfES is just a N-dimensional array that is used to hold the data values in a structured way. To do this in the example, create a 2D tensor of the used data type. The shape describes the size of the dimensions of the tensor. The first dimension (the rows) is the batch dimension, i.e. the dimension of the different input samples. If you process just one sample at a time, this dimension is 1. The second dimension equals the inputs of the neural network.

uint16_t in_shape[2] = {1, 3};
float in_data[1*3] = {1.0f, 0.0f, 0.0f};
aitensor_t in = AITENSOR_2D_F32(in_shape, in_data);
A tensor in AIfES.
Definition: aifes_math.h:89

Now everything is ready to perform the actual inference. For this you can use the function aialgo_inference_model().

// Create an empty tensor for the inference results
uint16_t out_shape[2] = {1, 2};
float out_data[1*2];
aitensor_t out = AITENSOR_2D_F32(out_shape, out_data);
aialgo_inference_model(&model, &in, &out);
uint8_t aialgo_inference_model(aimodel_t *model, aitensor_t *input_data, aitensor_t *output_data)
Perform an inference on the model / Run the model.

Alternative you can also do the inference without creating an empty tensor for the result with the function aialgo_forward_model(). The results of this function are stored in the inference memory. If you want to perform another inference or delete the inference memory, you have to save the results first to another tensor / array. Otherwise you will loose the data.

aitensor_t *y = aialgo_forward_model(&model, &in);
aitensor_t * aialgo_forward_model(aimodel_t *model, aitensor_t *input_data)
Perform a forward pass on the model.

Afterwards you can print the results to the console for debugging purposes:

aiprintf("input:\n");
aiprintf("NN output:\n");
void print_aitensor(const aitensor_t *tensor)
Printing a tensor to console.